One of the ways we’ve made our home fit our family is by adding a desk in the dining room. I know it’s not everyone’s cup of tea but it really helps organize papers and mail, both as they come in our home and as they go. For holidays and parties, we just clear it off and it becomes a sideboard for serving food. It’s become a mini-office, and a wonderful tool for keeping us organized and taming the avalanche of papers in our life.
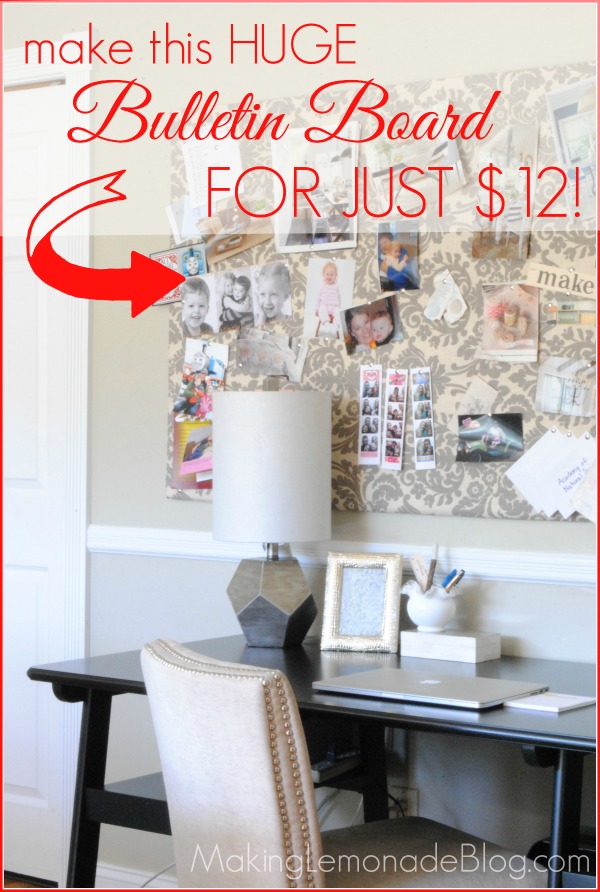
Bulletin boards are a utilitarian part of most offices, and I knew having one would be incredibly helpful for our family– but very ugly for our dining room. That’s when it occurred to me I could make my own bulletin board, make it pretty, and do so for about $12. REALLY. It’s become one of my favorite things in our home, our beautiful family ‘command center’, sprinkled with important memos and kid produced art and special photos too.
At first I decided to simply hang beautiful things like fabric samples and poetry, and perhaps a favorite business card or two.
Then I added some important pieces of paper I didn’t want to lose like our Jim Gaffigan tickets, permission slips, and losing Powerball tickets.
Next, a few favorite cards jumped on board simply because they made me happy.
It would be silly not to tuck a favorite photo in here and there, right?
Of course, the prolific art that started coming home from school needed a place to live. It soon became apparent this bulletin board was meant to hold that sweet art, with the added benefit that my kids are so stinkin’ proud to see it displayed.
For such a huge game-changer, the bulletin board itself cost next to nothing. The foam board was about $10, plus a few bucks for the thumbtack trim. The fabric was a piece I’ve had for years (I think it was waiting for it’s moment to shine!), so this project cost about $12 TOTAL. Want to make one too? Here’s how!
DIY Bulletin Board Tutorial
I knew I’d need a big car to transport the foam board home for the size I wanted. After stealing my husband’s SUV and making a break for it, I found exactly what I was looking for at Lowes– a huge piece of foam insulation board.
The material is very light and comes in large sizes so you can definitely make your bulletin board as big as you want. I’d recommend measuring the trunk of whichever vehicle you took to the store, because this stuff is BIG. The board was way bigger than the trunk of our Honda Pilot, so thankfully the size I wanted for the finished board (3′ X 5′) would also fit in our SUV.
Which is about the extent of my math skills. Please don’t force me to tell you how long it took to calculate that.
The guy at Lowes happily cut it to size, so I was able to carry it to the car myself (awkwardly, because I’m carrying a huge mother freaking board. but still, it was light enough to haul to my car without issue. just maybe not on a windy day or you might sail away.)
Once home, I test drove several fabrics to see which looked best. Originally I thought I was going to use either a white or oatmeal colored linen, but after trying this piece I knew it was the one!
Then I ironed the fabric so there were no wrinkles. Sidenote: when I hung it up, it looked like this:
I’m as good at ironing as I am at math, apparently.
But I digress. Iron that fabric, realllllly well. Then place the fabric face down on your floor. Place the foam insulation on top of it. Wrap the fabric around the sides making sure it’s straight, smooth, and even. Attach the fabric to the back, using large pieces of clear packing tape (or duct tape or flat thumbtacks. whatever floats your boat).
I’d show you pics, but this was a job that needed both hands all the way through. Plus my husband’s hands. It was all-hands on deck.
To hang, I simply drilled screws right through it into the wall. I’m calling the exposed screws ‘industrial chic.’ It’s really light, way lighter than an actual corkboard, so hanging it was a cinch.
Plus if you don’t like the look of the exposed screws you can just cover it with something else, like a favorite Christmas card.
I wanted to give it the look of nailhead trim so I bought a few boxes of thumbtacks to place around the border. Which ended up looking like I was Thumbtacking Under the Influence. So I took them out and thumbtacked around the edges instead, for a much better result (and no arrests for Drunk Thumbtacking).
So that’s the story of how my dining room acquired a gigantic bulletin board, and how that bulletin board acquired a lot of photos and art, and how those memories make our house a home.
Plus how I still have a garland of Christmas stars hanging from our chandelier. But that’s a story for another day.
Would this idea work for your home? What would you display on your ginormous bulletin board?
Linking up to: Home Stories A to Z :: My Uncommon Slice of Suburbia :: Todays Creative Blog :: Between Naps on the Porch


Oh, I love this! So pretty for everyday use!
Thanks so much! I love that it’s practical, but when I went a clean space I can take everything off and it doubles as a wall treatment.
Hey, hey!!! <3
I think I might actually put Alex on a project like this for down in the kitchen.
This is genius! All of the other DIY bulletin boards I’ve seen look way too complicated and involved for this DIY-challenged girl. I’ve been looking for something for my home office, and this is it! Thank you!!
(Oh, and I also LOVED the Dawn and vinegar combo you blogged about a while back for cleaning the shower. It works and is amazing. My shower and my kiddos thank you.)
If I can do it, ANYONE can do it! I’m pretty DIY challenged myself, I tend to rush things but this was very easy. It’s helpful to have an extra set of hands and eyes to make sure it’s straight, but other than that very simple. I’m so glad the Dawn/vinegar combo worked, I feel SO much better using that than chemical based cleaners. In fact, I just washed our bathmat in the washing machine using only vinegar instead of bleach and knew it was the right decision as soon as I saw my kids’ tushes sitting on it while taking a bath.
Thanks for letting me know you liked that tip, that means the world to me!
love the fabric and those tacks!! Awesome job!
This is GENIUS! Off to Home Depot I go!!
YAY! Let me know how it turns out!!
I love the fabric that you used for this project. It’s great to create something pretty for your home that’s also functional.
Great tute Carrie… I am inspired. xo
So pretty love the fabric!
Carrie, this is so pretty. I love the fabric and the thumbtack trim and also the fact that it is so useful!
Great idea, I love it! I found this post through Looksi, can’t wait to see what you do next!
Hey! That is a cool bulletin board. And the fabric looks familiar. Oh yeah, I used it for my duvet cover! I think we both have really good taste! Maybe you would like to check it (if you are so inclined). ~Trina
http://afewmineradjustments.blogspot.com/2013/02/how-to-make-duvet-cover-after-my-last.html
I love that fabric, it makes me so happy! It’s neutral and pretty. Thanks for sharing your link!
This is so cute! I’ve been looking for a good (cheap) way to make a bulletin board. Could you tell me what the thickness of the foam board you used is please? Thanks so much!
Hi Katherine! It’s a little hard for me to tell because it’s now wrapped in fabric, but I believe it’s about 3/4 of an inch. As long as it’s thicker than a thumbtack the foam board should work. Hope that helps!
Thanks so much! I looked the product up on the Lowe’s website and this is what I came up with: “Expanded Polystyrene Insulated Sheathing” http://www.lowes.com/pd_15358-46086-451156_0__?productId=3365576&Ntt=foam+insulation+board.
They didn’t seem to have any product that looked like the one in your image with the same name as your one in the picture (“Extruded Polystyrene Insulation Board”). Do you think that the one in the URL is the same/would work as well?
This should hopefully be my last question
Thanks for the help and the inspiration!
Hi Katherine, try this link:
http://www.lowes.com/pd_304091-210-304091.0_0__?productId=3122449&Ntt=extruded+polystyrene&pl=1¤tURL=%3FNtt%3Dextruded%2Bpolystyrene&facetInfo=
I can’t tell 100%, but my link looks more like what I used– it’s green and has the words ‘extruded polystyrene’. When you go, the insulation sheets should be close together and you should be able to find it there. Good luck, let me know if you find it!
I love your finished product! I wanted to make a bulletin board for my 94 year-old grandmother who lives in an assisted living facility. I found the link to your blog on Pinterest. Thanks for the great photos and easy to follow directions! I’m making one this weekend!
She’ll love it! Let me know how it turns out and snap a picture and send it to me!
That’s the easiest, and classiest, tutorial for a bulletin board I have seen, think this is the one for me! It looks fabulous.
Your bulletin board looks great! I want to make a large one for my daughter’s room. I’ve been debating what kind of cork-like material to use – cork squares, cork sheet, and now… “Expanded Polystyrene Insulated Sheathing”
Do you feel like the pins stay in the sheathing as well as in cork? I just don’t want her art and stuff falling down. Thanks!!!
They stay in REALLY well. I just use regular thumbtacks and they work perfectly, just as good as cork!
Thanks! I read on another blog that she added a layer of cork between the board and fabric, but that’s a whole extra step and added expense. Thanks again!
My mother has a DIY bulletin board that I think she really loves. The kind where you tuck a picture behind the crisscross ribbon strips. Sadly it is falling apart; ribbon are loose and it looks a mess. I have been looking for instructions for an updated version of that. I like that this doesnt have a picture frame, but does have the tacks to hold everything together. I might add the crisscross ribbon, just cause I know she likes it. I am thinking of a Saturday project for my mom, my sister and I to work on while I am home Easter weekend.
Maybe a little wine or a few mojitos. We might be doing a little tipsy tacking.
Crafting + Mojitos = perfection. Can I come? Haha! The crisscross ribbon would look great, and you can always stick a tack at the top too for extra security once you’ve tucked something in the ribbon. Have fun!